
What does the Masking app do?
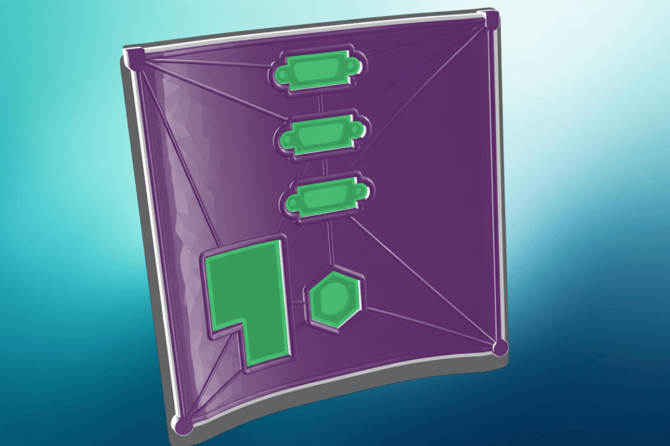
Custom masks improve consistency, reduce preparation time, and eliminate the need for manually applied masking tape or disposable masking materials. Because the mask is designed around the exact geometry of the workpiece, it can be positioned quickly and repeatably, making it ideal for both prototype and production environments.
The Masking app includes a range of configurable features such as locator pins, handles, guide rails, and structural nodes to help create masks that are easy to position, remove, and reuse across multiple finishing cycles.
How to design with the Masking app
Step 1 – Workpiece
The Workpieces step is where you import the part you want to create a custom masking solution for.
Import Workpieces
Upload your workpiece using Choose File or drag and drop it into the import area. STL is shown as the recommended format.
You can also select Try sample data to load the included example workpiece and explore the app without importing your own model.
Imported workpieces
Imported files are listed below the upload area. From here, you can:
- Delete – Removes the workpiece from the project.
- Fit to view – Centers the selected workpiece in the 3D viewport for easier inspection.
Once imported, the workpiece is displayed in the 3D viewport ready for you to define the areas that require masking.
Step 2 – Treatments
The Treatments step lets you import the surfaces that should remain exposed during the masking process. The app uses these surfaces to define the openings in the generated mask.
Treatment Surfaces
- Contour Type – Controls the shape of the contour generated around each treatment surface. Currently, Round is available, with further contour options planned.
Import Treatments
Upload treatment surfaces using Choose File or drag and drop them into the import area. STL is shown as the recommended format.
You can also select Try sample data to load the included example treatment surfaces.
Imported treatment surfaces
Each imported treatment surface appears separately in the panel. From here, you can:
- Delete – Removes the treatment surface from the project.
- Fit to view – Centers the selected treatment surface in the 3D viewport.
The generated contours are displayed around the imported treatment surfaces in the 3D viewport, providing a preview of the areas that will remain accessible through the mask.
Step 3 – Locator Pins
The Locator Pins step lets you use existing holes in the workpiece to accurately position the mask. Detected holes are shown as axes in the 3D viewport. Select a hole axis to assign it as a locator pin.
Using locator pins helps ensure the mask is correctly aligned and consistently positioned each time it's fitted to the workpiece.
Pin Geometry
- Pin Type – Select how the locator pins are created:
- 3D-printed – Generates the locator pins as part of the printable mask design.
- Custom – Lets you configure the mask for a custom locator pin.
- Choose from library – Shown as a future option for selecting standard pin components from a library.
- Pin Clearance – Sets the clearance between the locator pin and the corresponding hole in the workpiece. Increase the value to create a looser fit.
Step 4 – Features
The Features step lets you add locating guides, nodes, and handles to improve the positioning, stability, and usability of the mask. Click on the workpiece or mask to place a feature. Once placed, drag its marker dot to reposition it, or drag the marker away from the workpiece surface to remove it.
Locating Guides
Locating guides help align the mask against the edges of the workpiece.
- Guide Clearance – Sets the clearance between the locating guide and the workpiece.
- Add Guides – Activates guide placement. Click near an edge of the workpiece and the app identifies the closest edge and creates a flat contact point, helping locate the mask accurately.
Nodes
Nodes add extra structure or contact points to the mask. They can be used to reinforce the mask, create additional contact with the workpiece, or extend the mask's coverage area.
- Add Nodes – Activates node placement. Click on the workpiece or mask to position a node where additional structure is required.
Handles
Handles make it easier to manually position and remove the finished mask.
- Add Handles – Activates handle placement. Click on the mask to add a spherical handle at the required location.
Step 5 – Mask Frame
The Mask Frame step controls the overall thickness and stiffness of the generated mask structure. You can start with a predefined stiffness setting or adjust the individual dimensions to suit your application.
Mask stiffness
Choose a predefined configuration for the mask:
- Low – Creates a lighter, more flexible mask structure.
- Medium – Provides a balance between rigidity and material usage.
- High – Creates a stronger, more rigid mask structure.
- Custom – Lets you define the frame dimensions individually.
Frame dimensions
The values below define the geometry of the mask and can be adjusted to fine-tune the result:
- Outer Frame Thickness – Sets the thickness of the outer frame surrounding the treatment areas.
- Inner Frame Thickness – Sets the thickness of the internal frame connecting the different areas of the mask.
- Mask Thickness – Sets the overall thickness of the mask structure.
Step 6 – Export
The Export step lets you control what's shown in the viewport and save the finished mask for 3D printing or further CAD processing.
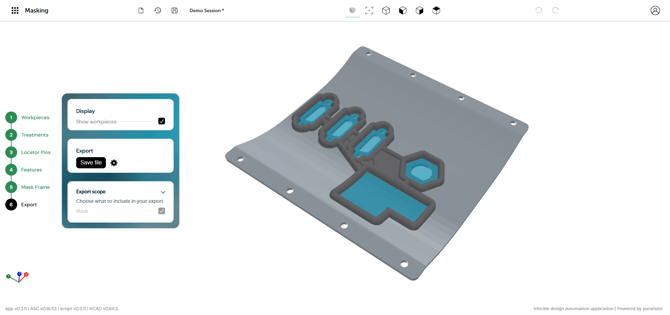
Display
- Show workpieces – Shows or hides the workpiece geometry in the 3D viewport, making it easier to inspect the finished mask on its own.
Export
Select Save file to export the finished mask. Use the settings button to configure:
- Name – Sets the filename for the exported model.
- Model format – Choose between STL for 3D printing or STEP for further CAD processing.
Export scope
- Mask – Includes the generated mask geometry in the exported file.
Once exported, your custom mask is ready for 3D printing and use on the workpiece. The finished design combines accurately defined treatment areas with locating features and a lightweight frame, helping ensure consistent positioning and repeatable masking across production workflows.
App tips and tricks
- Choose a mask stiffness that suits your application. More rigid masks provide greater durability, while more flexible designs can conform more easily to complex geometry.
- Use locator pins or guide rails wherever possible to improve repeatability and reduce setup time.
- Add handles to make masks easier to install and remove, particularly when working with gloves or coated parts.
- Include structural nodes where additional strength is needed without significantly increasing print time.
- Consider the finishing process when selecting your print material. Some coatings, temperatures, and chemicals require more resistant engineering polymers.
- Test the mask on a sample part before using it in production to confirm coverage and fit.